A rack is packed once. A radio mic rack keeps its receivers in it from one job to the next, and nobody should have to scan them in again every Friday. Tell Rental HQ what is built into it, and one scan of the rack preps it, sends it out and brings it home, while anything you add for one job still comes back on its own.
This walk-through uses Smart Scan, which is how every company scans unless it has chosen One step at a time under Settings → Warehouse.
1. Permanent or Temporary
A case is a product like any other, with a barcode on each case you own. What matters is what kind of case it is.
- Permanent: a rack or a drum case that always carries the same kit. The contents live in it: an RF rack with its four receivers, a drum mic case with its kick mic, toms and overheads
- Temporary: a trunk or a case packed for one job and emptied when it comes back. A cable trunk, a mixed trunk of stands and DIs
To set it:
- Open the case product from Inventory and click Edit
- Tick Case or rack
- Under What kind of case, choose Permanent. A rack or Temporary. A trunk or case, and save
For a permanent case, the product’s Accessories set as default are what it should hold. Adding the case to a job from the office brings those lines with it, and a case scanned at prep says if it is short of any of them.
Imported racks arrive as ordinary products. Open each one, tick Case or rack, then choose Permanent for the ones that travel packed. A case with no kind chosen works as temporary.
2. Build the Case
Each permanent case you own is built once, by asset number: a kit says “two SM58s”, a built case says these two SM58s.
- Open the case itself: Inventory, the case product, its Assets tab, then the case. Or scan or type its label into the command palette
- Under In this case, scan or type each unit that lives in it: its barcode or its serial number. Each one goes in as you scan it
- Take one out with the cross on its row, or clear the lot with Empty this case
A unit already in another case moves here, and says where it came from. The builder refuses a unit that is out on a job, one that has been written off or sold, the case itself, and a case inside something it holds. Every change goes on both items’ history. On the Mac the builder is on the case’s Overview; on the iPhone it is a section of the case’s page, where you swipe a row to take it out. A Bluetooth scanner types straight into the field on either.
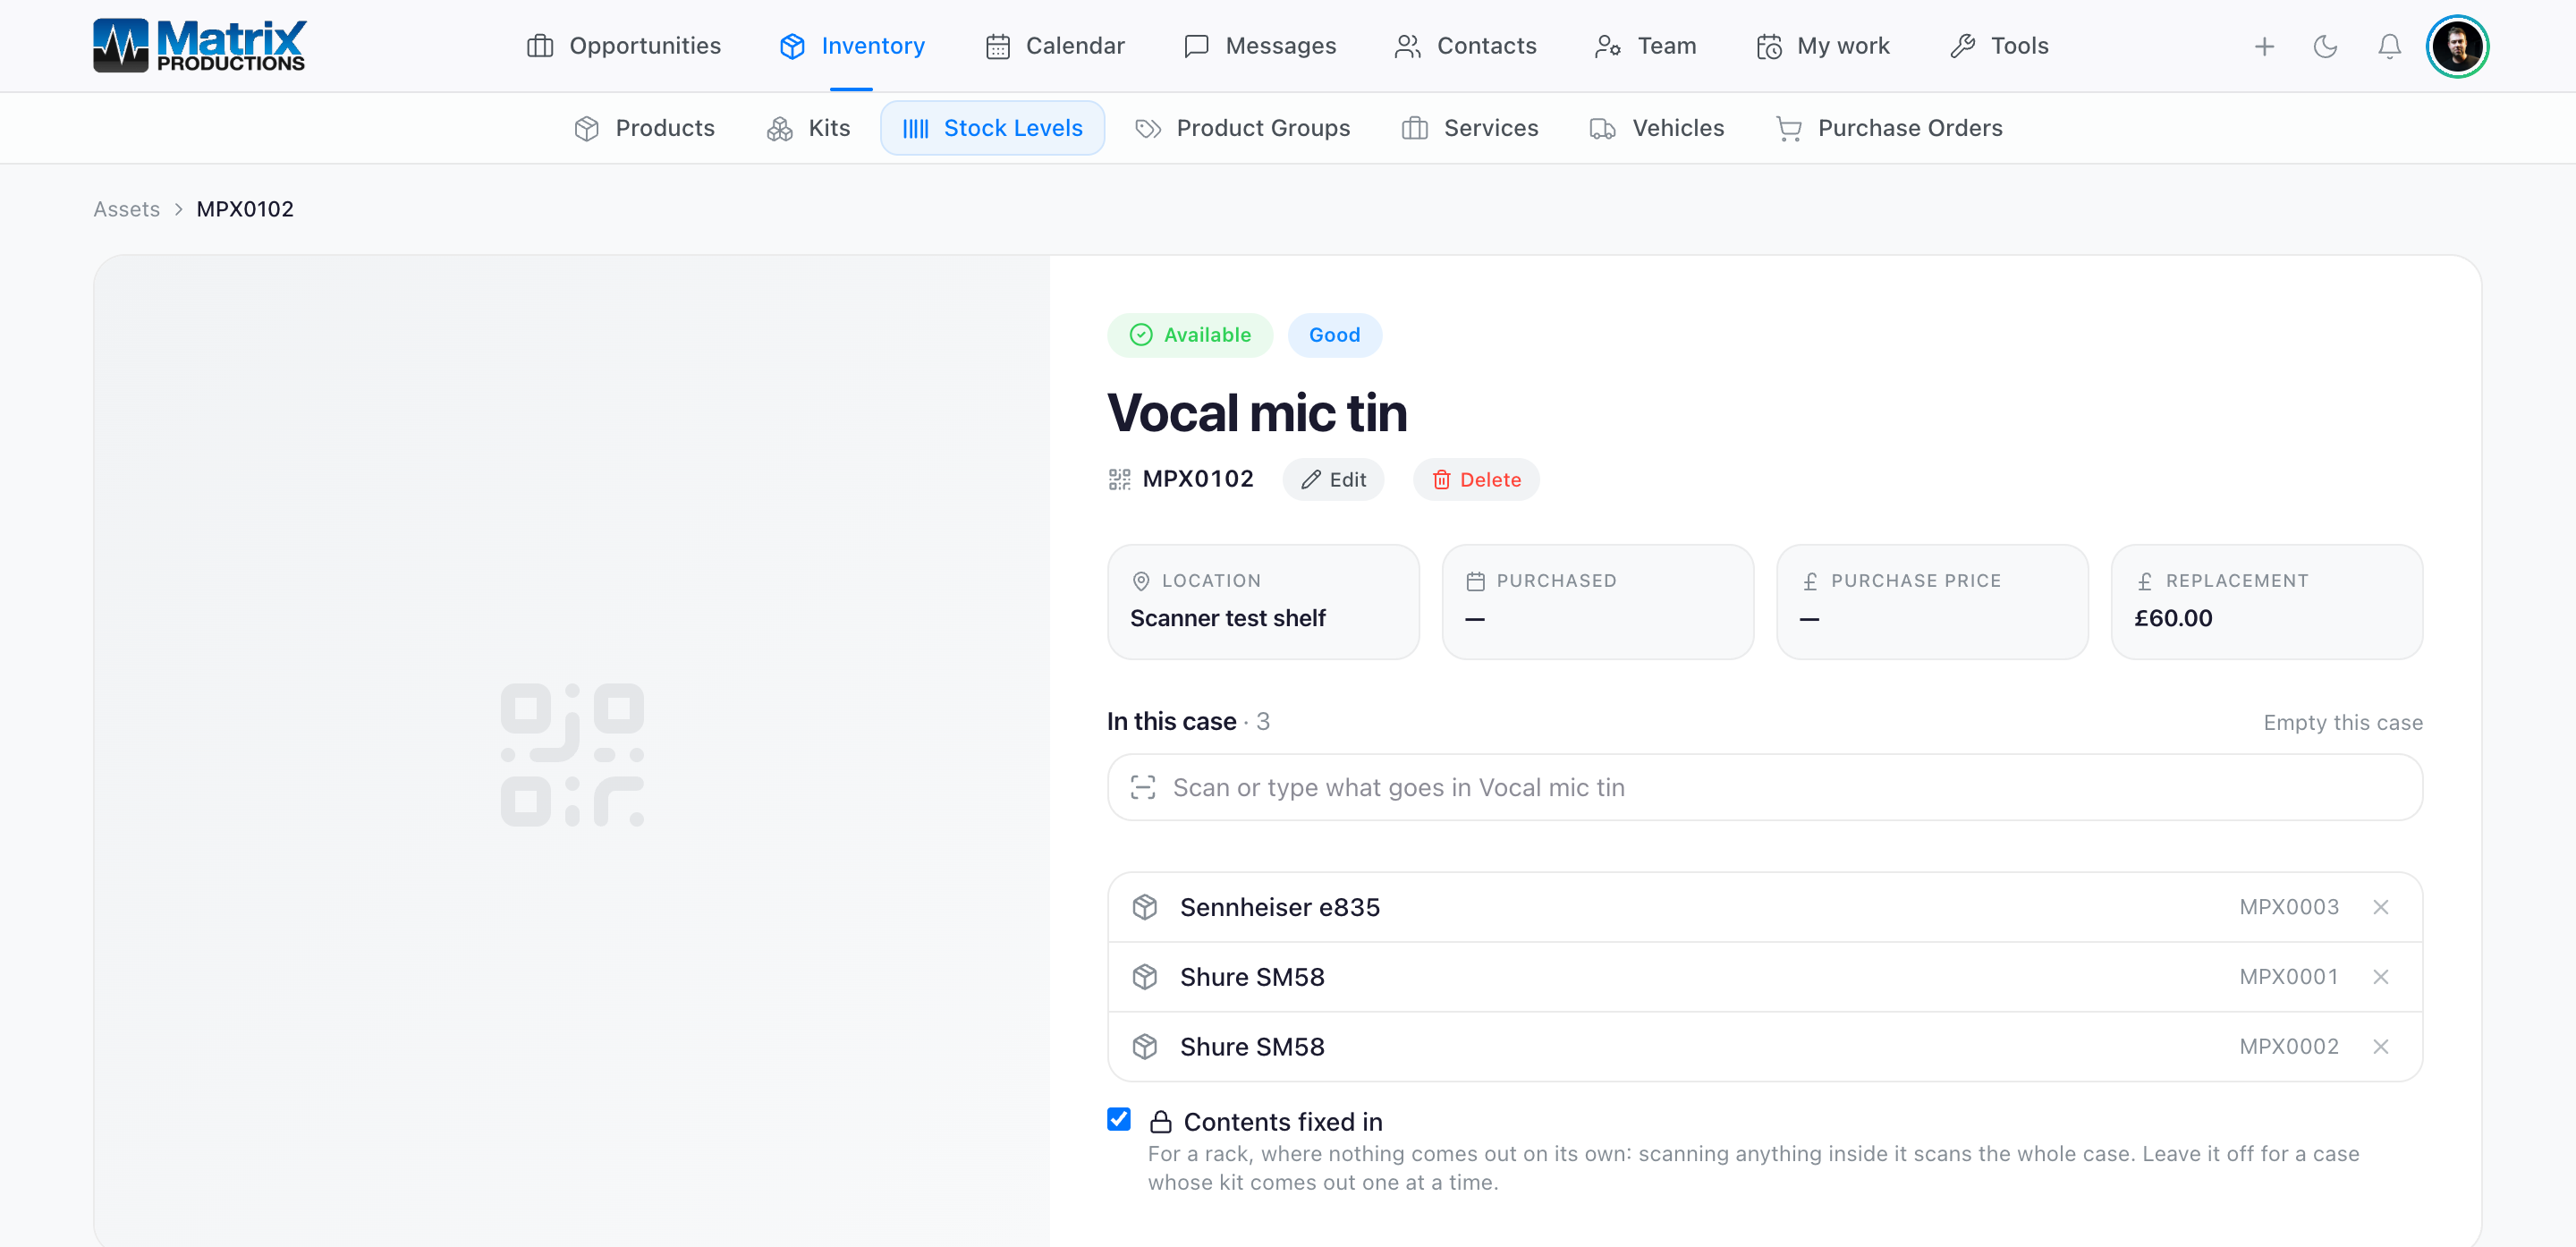
Contents fixed in
Tick Contents fixed in for a rack, where nothing comes out on its own. Scanning anything inside it then scans the whole rack, and the band says why: somebody who scans a receiver has picked up the rack. Two exceptions:
- With Release on, scanning one unit takes that unit out: back on the shelf, still on the job, and out of the rack. That is how a faulty receiver is swapped
- With a case open, packing or checking, a scan means that unit
Leave it off for a case whose kit comes out one at a time, like a drum mic case at a festival.
Importing units straight into their cases
Kit that lives racked in a case you cannot easily open can arrive already built in, from the Assets import. Two columns do it:
- Inside Case: the barcode of the case the unit is in. The case can be a unit already in Rental HQ, or one on another row of the same file, above or below. A case can go inside another case the same way
- Contents Fixed (yes/no): Yes on a case’s own row ticks Contents fixed in for it
Each unit goes in exactly as if you had scanned it into the builder, and the case’s history says it came from the import. The check lists a row as a problem when its case cannot be found, is not a permanent case, is out on a job, would go inside itself, or sits more than seven cases deep, and a unit whose case is left out is left out too. Headings such as Case, In case and Packed in are recognised as Inside Case.
3. Prep: One Scan of the Case
- Put what the case holds on the job. Add the rack from the equipment picker, which brings its contents with it, or add the contents themselves, for example 4 receivers
- Scan the case at the bench. It joins the job if it is not on it, at no charge, and what is built into it is claimed onto the job’s lines. The band says what came with it, and anything missing, in amber: “3 from the case · no Shure SM58”. Whatever the case should hold that the job has not asked for goes on the job with it, at no charge and off the quote
- A case that arrives complete closes itself, with everything in it ready: “Closed, 4 from the case · scan it again to add to it”. A case that is short stays open for what is missing to be scanned in. Loose defaults that cannot carry a label of their own, like mic clips, are listed as “3 Mic clip to scan” and scanned in each time
- Add kit for this trip only. Scan the case again to open it, scan the extra items in (handheld mics into the rack’s drawer, say), and scan the case to close it. If the job has not asked for them, the station asks first, and scanning the item again says yes. They travel in the case, but they are not part of what it holds, so they come home on their own scans
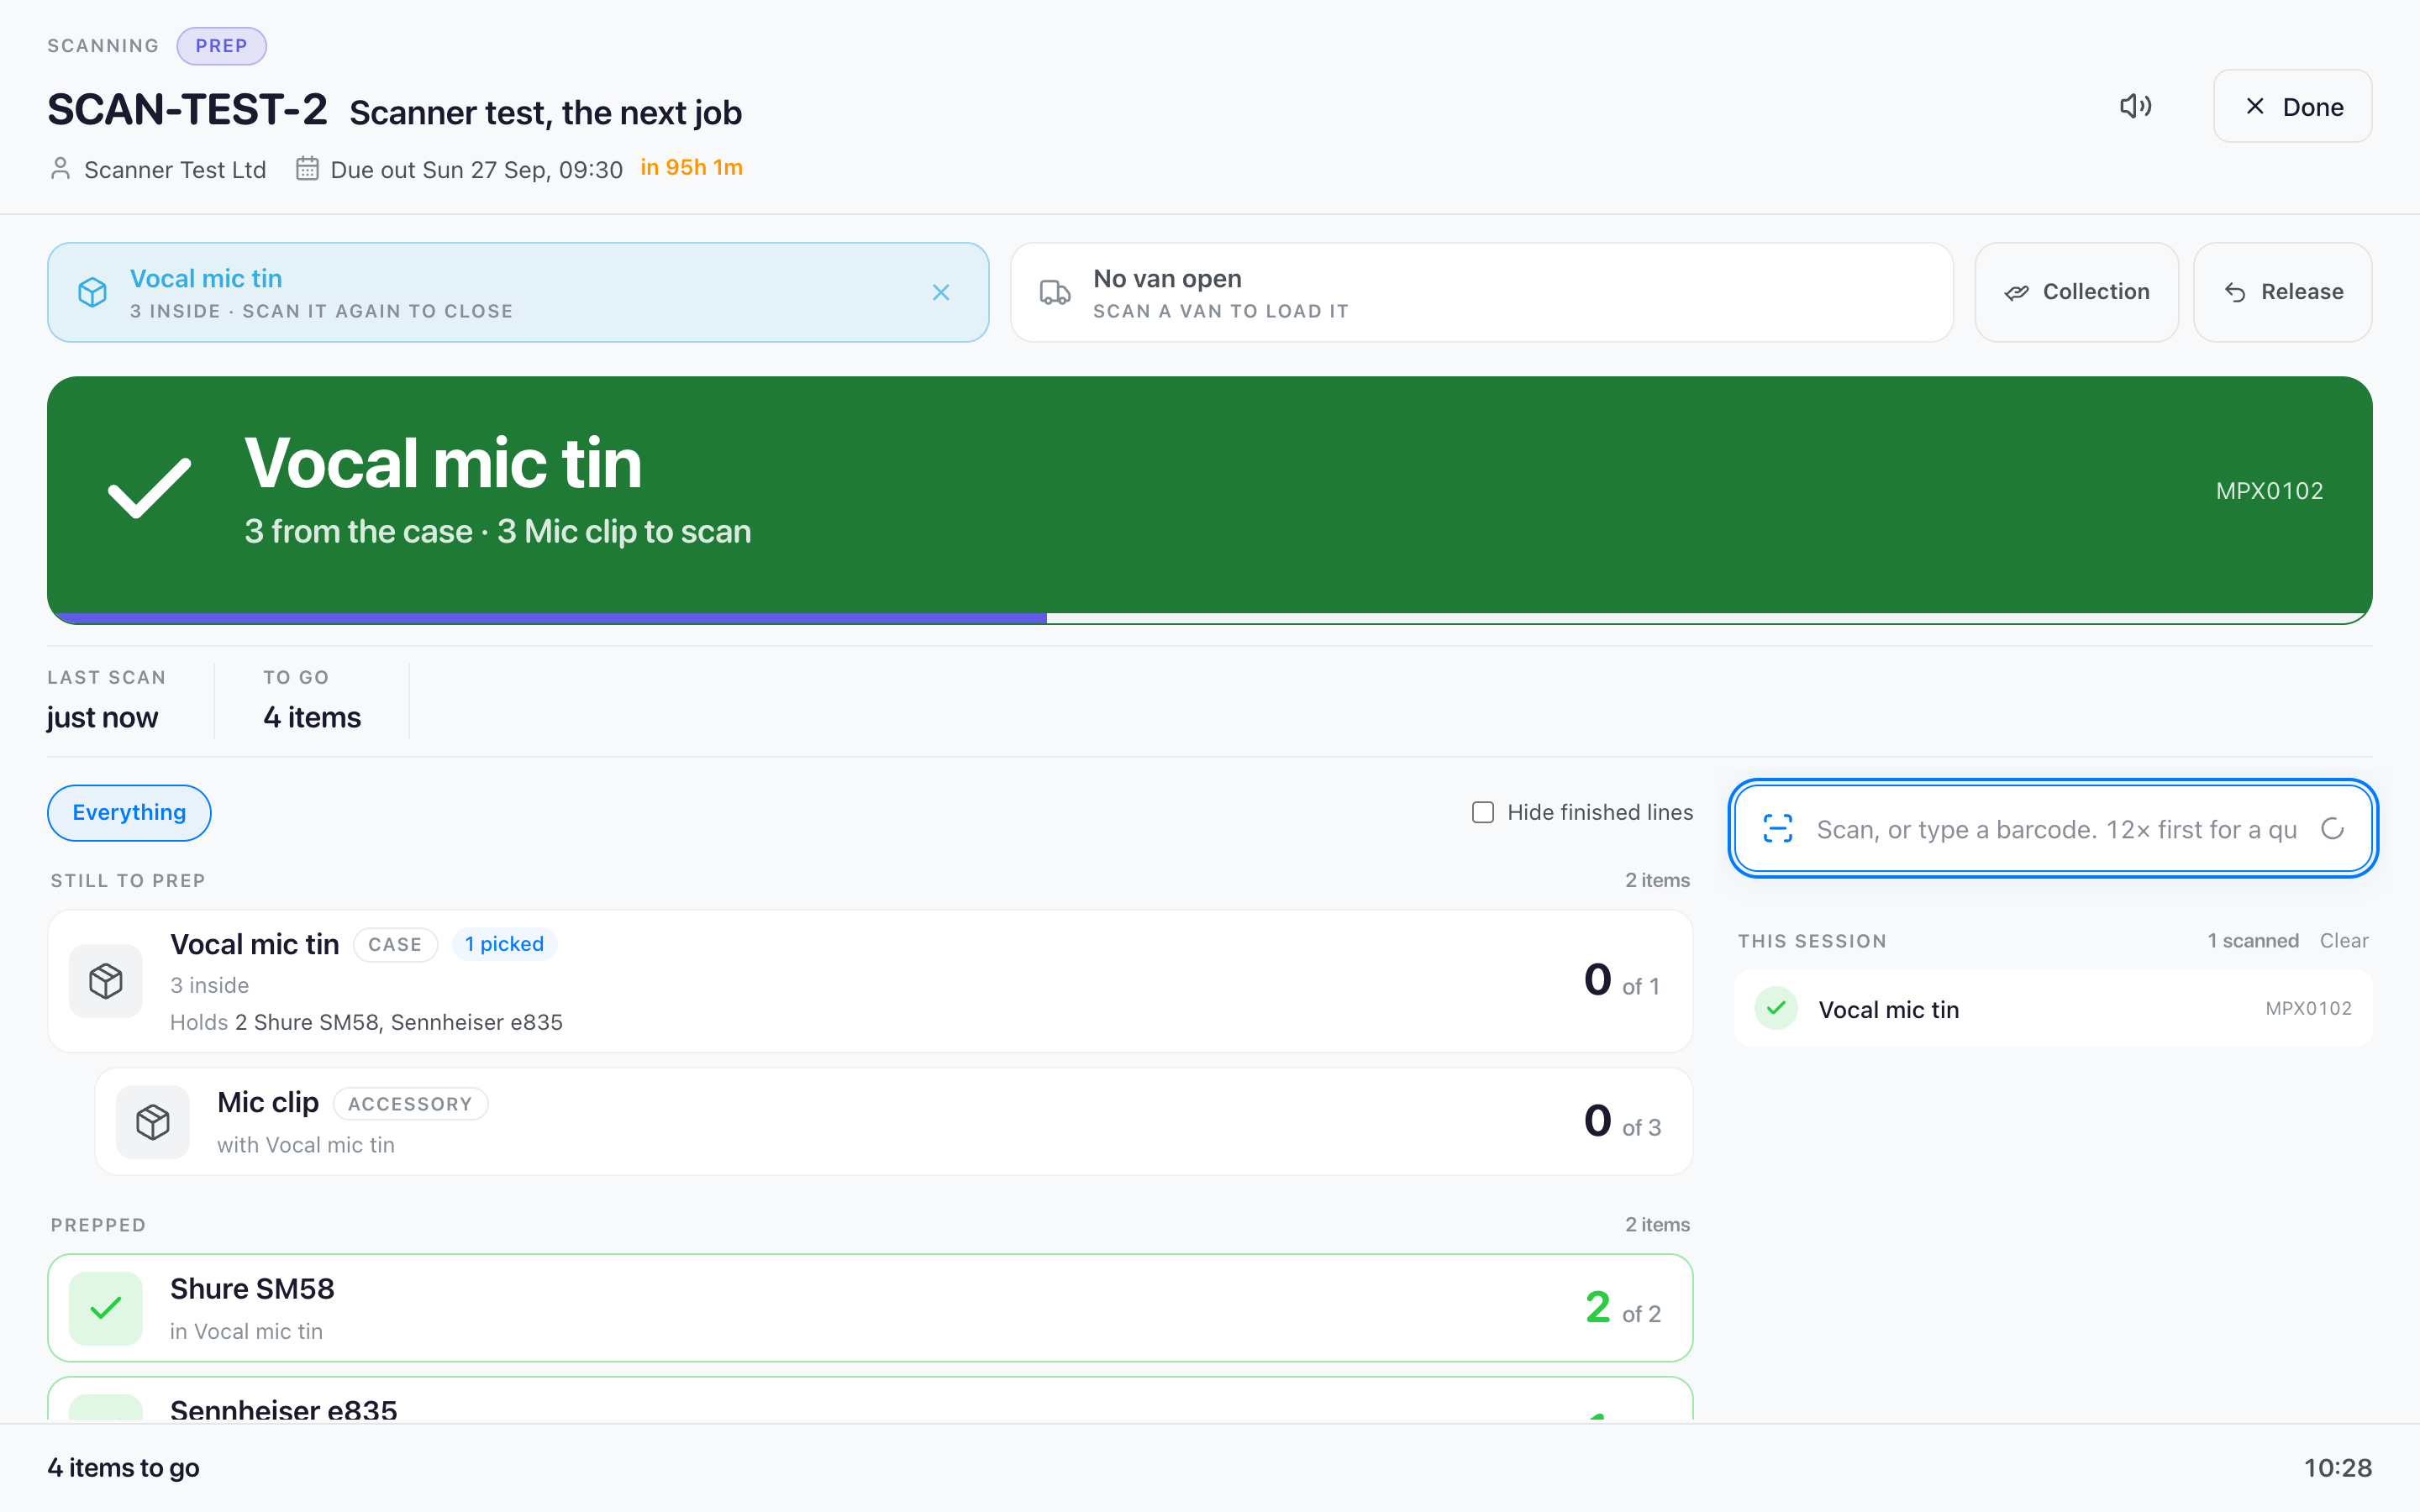
A temporary case works the same way without the first half: scan it to open it, scan what goes in, scan it again to close it. A closed case, temporary or permanent, can go inside another open case, so a small case of DPA mics can travel inside a trunk.
4. Send It Out
- Scan the van’s label to open it for loading (see Vans and their labels), or press Collection if the customer is taking it
- Scan the case once. It goes on the van with everything in it, the extras for this trip included: “Case loaded onto Van 2”
Scanning a unit that is packed in a case, with a van open, is refused with the case named, because the case is how it travels. When the last thing is loaded, the job goes out by itself.
5. Coming Home
Once the job has gone out, scanning the case brings it home.
- A permanent case brings home what is built into it, including any permanent case built into it. The band says what came back and what is still to scan: “Case back, with 6 inside. 1 loose to scan in”. Scan the loose items in one by one, or type a quantity for bulk, such as 3x, and scan
- A temporary case comes home on its own. What was in it gets split across trunks at the venue, so everything that went out in it is scanned in separately: “Case back. 3 inside to scan in on their own”

Checking a case that has come back
The return scan at the tail lift brings a permanent case home in a second, which is right, and it means nobody has opened it. To check one, scan it again once it is back: the band reads “Checking”. Scan what is in it, then scan the case again to close the check. Anything not seen goes back to being out on the job it came home from, which is where the office looks for kit that has not turned up. When that job is an outstanding kit job that has been invoiced, its invoice stays as it was: an item that came back before the invoice goes out at no charge on an outstanding kit job from the same original job instead, one still open and not yet invoiced, or a new one. An item that is already somewhere else, booked on another job or in maintenance, stays where it is, and the check says where. Opening a check changes nothing until you close it.
Check contents on return
Some kit must not be booked back just because its case came home. Tested cable in a stillage, the open cage it travels in, is the usual reason: cable goes missing on site, and you want to know the day it comes back, not at the next job. Open the case product from Inventory, click Edit, choose Permanent and tick Check contents on return. Every case of that product then works like this:
- Going out is the same as any permanent case. One scan makes it and everything in it ready, and loading it sends the lot
- Coming back, scanning the case brings the case home and nothing else. The band reads “Case back. Scan the 40 inside one at a time”, and a check of the case opens by itself
- Each item stays out on the job until it is scanned, and is not offered to another job until then. Scanned in, it keeps its place in the case, so the case goes out full next time
- Scan the case again to finish, once something has been scanned in since the case came back. Anything nobody scanned stays out on the job as outstanding kit, and stays built into the case: the next job leaves it behind by name while it is out. When it turns up, one scan on that job brings it home. A read of the case before anything has been scanned in since it came back changes nothing
It is off for every case until you set it, and any other case works as it always has. To turn it off, untick it on the product, or on any of its cases under In this case.
6. Loose Scans, Tip Out and Weight
- Packing loose scans. Scanned a few things loose that should have gone in a case? Switch on Offer to pack loose scans into a case under Settings → Warehouse, and opening a case after loose scans asks to pack them in
- Tip out. A barcode on the scanner commands sheet that moves everything from one case into the open one, and leaves the first case empty and still on the job
- What is in it. Look up on a case says what is in it and what it weighs
- Max load. Give a case a Max load on its product and the open case shows its weight against it, such as 38 of 45 kg. Packing past it asks first. Set Two-person lift over under Settings → Warehouse, and heavy cases are tagged on the scan station, on their line and on their label
- Lines or Cases. A job with cases has a Lines and Cases switch on its Equipment toolbar: a card per case, with what is in it, and Put in case and Take out of case at the desk
- Always accessories travel in their case. Accessories set to Always on a product inside a permanent case count as that case’s contents
7. Tips
- An RF or IEM rack: build the receivers or transmitters in, tick Contents fixed in, and add the handhelds or packs per job. The rack comes home with its receivers, and each handheld is scanned in on its own
- Some cases of a product stay empty? Keep the product’s default contents empty. Defaults are what every case of that product should hold, so a product whose cases vary is better built case by case in the builder
- You do not have to build a case before its first job. A permanent case learns its defaults the first time it is packed and closed, so a drum case whose defaults are a kick mic and four toms knows them from then on. A fifth tom stays loose
- Imported your data? Your racks arrived as ordinary products. Open each rack product, tick Case or rack, then choose Permanent, and build the racks you own
Next Steps
- Smart Scan: Everything else the station does
- Managing Products: Accessories and default contents
- Overdue & Missing Kit: When something does not come home